> For the complete documentation index, see [llms.txt](https://overleaf-pro.ayaka.space/llms.txt). Markdown versions of documentation pages are available by appending `.md` to page URLs; this page is available as [Markdown](https://overleaf-pro.ayaka.space/texlive/zh-tw/tao-jian-xiang-guan/minted.md).
# {Minted}
本文示範如何使用 [`minted` 套件](https://ctan.org/pkg/minted?lang=en) 在 LaTeX 文件中格式化並高亮顯示程式語言原始碼,以下先從一個範例開始:
```latex
\documentclass{article}
\usepackage{minted}
\begin{document}
\begin{minted}{python}
import numpy as np
def incmatrix(genl1,genl2):
m = len(genl1)
n = len(genl2)
M = None #成為關聯矩陣
VT = np.zeros((n*m,1), int) #dummy variable
#計算位元異或矩陣
M1 = bitxormatrix(genl1)
M2 = np.triu(bitxormatrix(genl2),1)
for i in range(m-1):
for j in range(i+1, m):
[r,c] = np.where(M2 == M1[i,j])
for k in range(len(r)):
VT[(i)*n + r[k]] = 1;
VT[(i)*n + c[k]] = 1;
VT[(j)*n + r[k]] = 1;
VT[(j)*n + c[k]] = 1;
if M is None:
M = np.copy(VT)
else:
M = np.concatenate((M, VT), 1)
VT = np.zeros((n*m,1), int)
return M
\end{minted}
\end{document}
```
此範例會產生以下輸出:
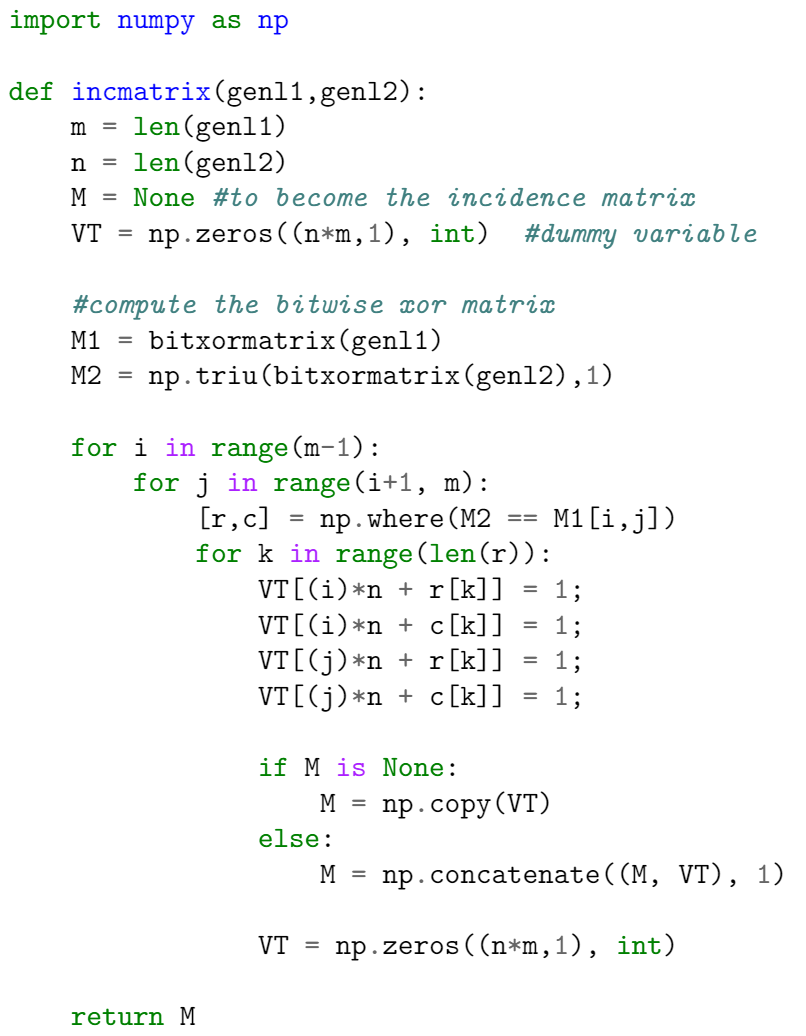
這裡有兩個重要的指令。在前言區塊中,套件是透過撰寫
```latex
\usepackage{minted}
```
然後標籤 `\begin{minted}{python}` 和 `\end{minted}` 來界定一個環境,該環境會以等寬字體原樣列印文字,並且也會為註解、關鍵字與函式套用顏色。參數 `python` 是原始碼所使用的程式語言。 `minted` 支援超過 150 種程式與標記語言,以及設定檔,請參閱 [參考指南](https://www.overleaf.com/learn/latex/Code_Highlighting_with_minted#Reference_guide) 以查看支援語言清單。
**注意**: 若要讓 `minted` 能在你的 *本機* LaTeX 發行版中運作,必須另外安裝一個稱為 [Pygments](https://pygments.org/) 的程式。 [Overleaf](https://www.overleaf.com/) 可免去你安裝它以及為編譯文件而必須執行特殊指令的麻煩——在 Overleaf 上,使用 `minted` 的文件可以「開箱即用」。
### 基本用法
如下例所示, `minted` 環境可以被設定來修改排版後程式碼的視覺呈現。這裡, `minted` 環境使用多個以逗號分隔、格式為 `key=value`:
```latex
\documentclass{article}
\usepackage{minted}
\usepackage{xcolor} % 用以存取命名顏色 LightGray
\definecolor{LightGray}{gray}{0.9}
\begin{document}
\begin{minted}
[
frame=lines,
framesep=2mm,
baselinestretch=1.2,
bgcolor=LightGray,
fontsize=\footnotesize,
linenos
]
{python}
import numpy as np
def incmatrix(genl1,genl2):
m = len(genl1)
n = len(genl2)
M = None #成為關聯矩陣
VT = np.zeros((n*m,1), int) #dummy variable
#計算位元異或矩陣
M1 = bitxormatrix(genl1)
M2 = np.triu(bitxormatrix(genl2),1)
for i in range(m-1):
for j in range(i+1, m):
[r,c] = np.where(M2 == M1[i,j])
for k in range(len(r)):
VT[(i)*n + r[k]] = 1;
VT[(i)*n + c[k]] = 1;
VT[(j)*n + r[k]] = 1;
VT[(j)*n + c[k]] = 1;
if M is None:
M = np.copy(VT)
else:
M = np.concatenate((M, VT), 1)
VT = np.zeros((n*m,1), int)
return M
\end{minted}
\end{document}
```
此範例會產生以下輸出:
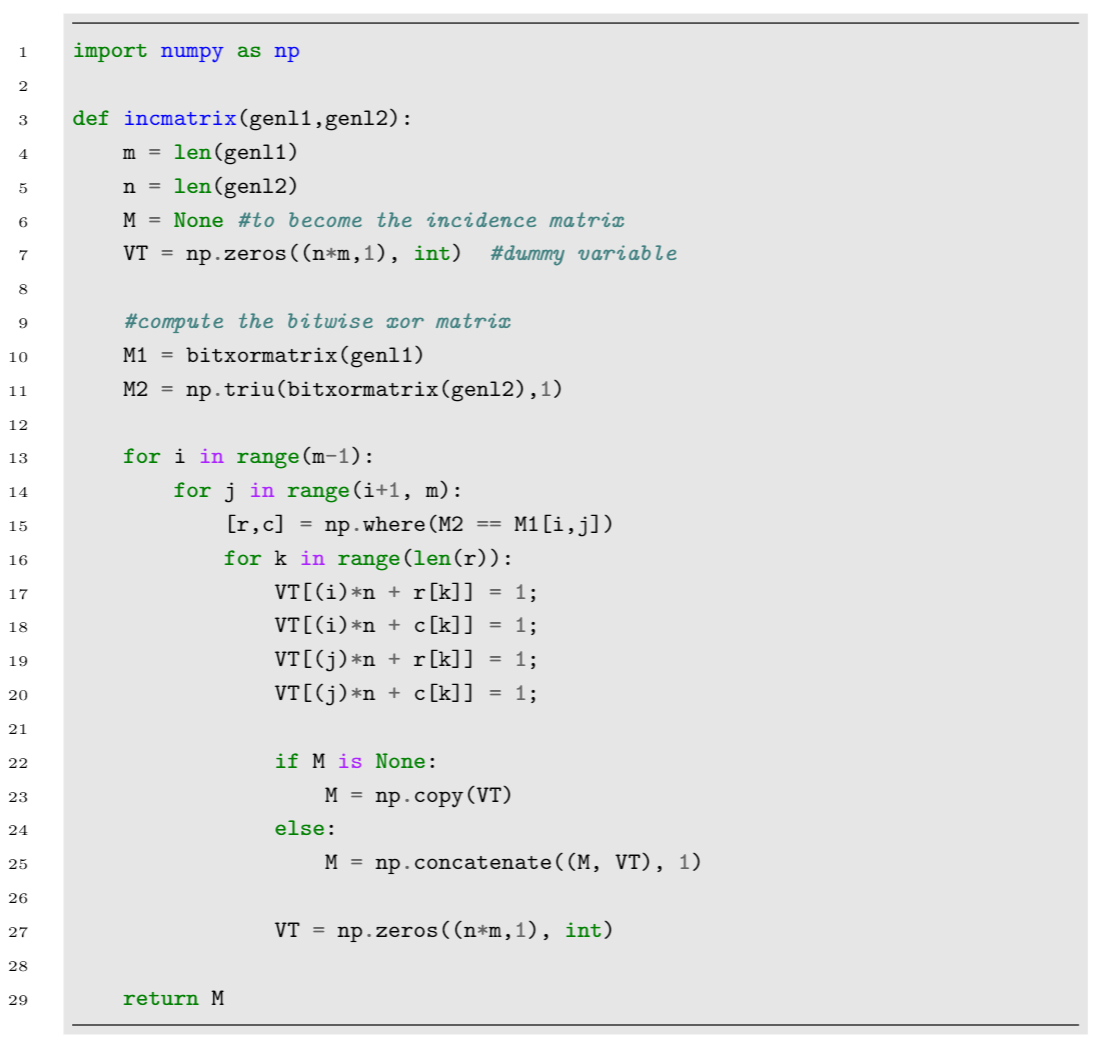
本範例使用的參數如下:
* `frame=lines`: 會畫出兩條線,一條在程式碼上方、一條在下方,將其框住。其他可能的值有 `leftline`, `topline`, `bottomline` 和 `single`.
* `framesep=2mm`: 框與內容的間距設為 2mm。也可使用其他 [長度單位](https://www.overleaf.com/learn/latex/Lengths_in_LaTeX) 。
* `baselinestretch=1.2`: 程式碼的行距設為 1.2。
* `bgcolor=LightGray`: 背景顏色設為 `LightGray`。你需要匯入 `xcolor` 套件才能運作。請參見 [在 LaTeX 中使用顏色](https://www.overleaf.com/learn/latex/Using_colours_in_LaTeX) 以進一步了解顏色操作。
* `fontsize=\footnotesize`: 字體大小設為 `footnotesize`。也可以設定任何其他 [字體大小](https://www.overleaf.com/learn/latex/Font_sizes_and_kinds%23Reference_guide) 。
* `linenos`: 啟用行號。
其他可能有用的選項有:
* `mathescape`: 在程式碼註解中啟用數學模式。
* `rulecolor`: 變更框線的顏色。
* `showspaces`: 啟用特殊字元以顯示空格。
### 從檔案包含程式碼
程式碼通常儲存在原始碼檔案中,因此,一個可自動從檔案匯入程式碼的指令非常方便,如下例所示:
```latex
\documentclass{article}
\usepackage{minted}
\title{使用 minted 匯入檔案}
\begin{document}
接下來的程式碼將直接從檔案匯入:
\inputminted{octave}{BitXorMatrix.m}
\end{document}
```
此範例會產生以下輸出:
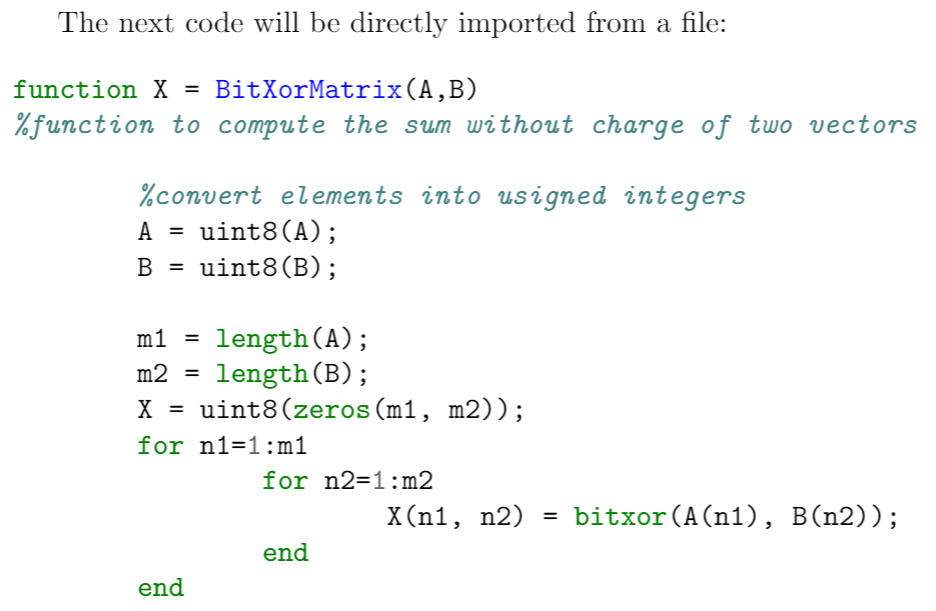 指令 `\inputminted{octave}{BitXorMatrix.m}` 會從檔案 `BitXorMatrix.m`匯入程式碼,參數 `octave` 會告訴 LaTeX 該程式碼所使用的程式語言。此指令可額外接受兩個參數,只匯入檔案的一部分;例如,若要匯入第 2 行到第 12 行的程式碼,指令會變成:
```latex
\inputminted[firstline=2, lastline=12]{octave}{BitXorMatrix.m}
```
### 單行程式碼
如果你只需要輸入一行程式碼,指令 `\mint`就能派上用場,其語法如下個範例所示。
{% code overflow="wrap" %}
```latex
單行程式碼格式化也可搭配 \texttt{minted} 使用。例如,像這樣的一小段 HTML:
\mint{html}|
指令 `\inputminted{octave}{BitXorMatrix.m}` 會從檔案 `BitXorMatrix.m`匯入程式碼,參數 `octave` 會告訴 LaTeX 該程式碼所使用的程式語言。此指令可額外接受兩個參數,只匯入檔案的一部分;例如,若要匯入第 2 行到第 12 行的程式碼,指令會變成:
```latex
\inputminted[firstline=2, lastline=12]{octave}{BitXorMatrix.m}
```
### 單行程式碼
如果你只需要輸入一行程式碼,指令 `\mint`就能派上用場,其語法如下個範例所示。
{% code overflow="wrap" %}
```latex
單行程式碼格式化也可搭配 \texttt{minted} 使用。例如,像這樣的一小段 HTML:
\mint{html}|Something here
|
\noindent 可以正確格式化。
```
{% endcode %}
此範例會產生以下輸出:
 大括號之間的參數會設定程式語言(`html` 在此為標記語言),而要格式化的實際文字則由 '|' 字元界定。
### 自架 Overleaf 的問題
如果你正在使用 sandbox 編譯,且也使用 overleaf 伺服器來部署 overleaf,minted 可能無法正常運作。更詳細的資訊可參見: [issues/131](https://github.com/yu-i-i/overleaf-cep/issues/131)。你需要啟用 ARM 指令設定檔以及某些系統呼叫,minted 才能運作。
---
# Agent Instructions
This documentation is published with GitBook. GitBook is the documentation platform designed so that both humans and AI agents can read, navigate, and reason over technical content effectively. Learn more at gitbook.com.
## Querying This Documentation
If you need additional information that is not directly available in this page, you can query the documentation dynamically by asking a question.
Perform an HTTP GET request on the current page URL with the `ask` query parameter, and the optional `goal` query parameter:
```
GET https://overleaf-pro.ayaka.space/texlive/zh-tw/tao-jian-xiang-guan/minted.md?ask=&goal=
```
`ask` is the immediate question: it should be specific, self-contained, and written in natural language.
`goal` is optional and describes the broader end goal you are ultimately trying to accomplish on behalf of the user. GitBook uses it to tailor the answer towards what is most useful for that goal.
The response will contain a direct answer to the question and relevant excerpts and sources from the documentation.
Use this mechanism when the answer is not explicitly present in the current page, you need clarification or additional context, or you want to retrieve related documentation sections.
大括號之間的參數會設定程式語言(`html` 在此為標記語言),而要格式化的實際文字則由 '|' 字元界定。
### 自架 Overleaf 的問題
如果你正在使用 sandbox 編譯,且也使用 overleaf 伺服器來部署 overleaf,minted 可能無法正常運作。更詳細的資訊可參見: [issues/131](https://github.com/yu-i-i/overleaf-cep/issues/131)。你需要啟用 ARM 指令設定檔以及某些系統呼叫,minted 才能運作。
---
# Agent Instructions
This documentation is published with GitBook. GitBook is the documentation platform designed so that both humans and AI agents can read, navigate, and reason over technical content effectively. Learn more at gitbook.com.
## Querying This Documentation
If you need additional information that is not directly available in this page, you can query the documentation dynamically by asking a question.
Perform an HTTP GET request on the current page URL with the `ask` query parameter, and the optional `goal` query parameter:
```
GET https://overleaf-pro.ayaka.space/texlive/zh-tw/tao-jian-xiang-guan/minted.md?ask=&goal=
```
`ask` is the immediate question: it should be specific, self-contained, and written in natural language.
`goal` is optional and describes the broader end goal you are ultimately trying to accomplish on behalf of the user. GitBook uses it to tailor the answer towards what is most useful for that goal.
The response will contain a direct answer to the question and relevant excerpts and sources from the documentation.
Use this mechanism when the answer is not explicitly present in the current page, you need clarification or additional context, or you want to retrieve related documentation sections.